
Wildlife photography is often considered one of the most challenging yet rewarding forms of photography. Unlike studio or portrait photography, you can’t ask a lion to pose or a bird to stay still. It demands not only technical skill but also patience and a deep connection with the natural world.
Essential Gear for Wildlife Photography:
You don’t need the most expensive equipment to get started, but having the right tools can make a significant difference.
1. Camera: A DSLR or mirrorless camera with fast autofocus and good low-light performance is ideal. Models like the Canon EOS 5D Mark IV or Nikon D850 are popular among professionals.
2. Lenses: A telephoto lens (e.g., 100-400mm or 200-600mm) is essential for capturing animals from a distance. Macro lenses are great for insects and small creatures.
3. Tripod or Monopod: Helps stabilize your camera, especially when using heavy lenses.
4. Camouflage and Blinds: Animals are easily spooked. A camouflage cover or portable blind can help you blend into the environment.
5. Extras: Weather-sealed gear, extra batteries and memory cards, and protective covers for rain or dust are often the difference between getting the shot and going home empty-handed.
The Mindset of a Wildlife Photographer:
Before you even pick up your camera, it’s important to understand what makes wildlife photography so uniquely challenging—and rewarding.
1. Patience Above All
Wildlife doesn’t follow directions. Capturing the right moment can take hours, sometimes even days. Use this time to observe behavior, learn patterns, and anticipate action. The best shots often come to those who are prepared to be still and watchful.
2. Respect for Your Subject
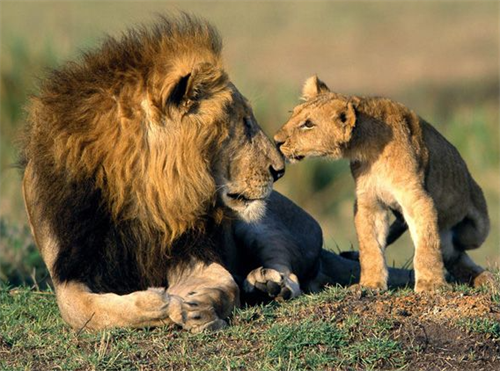
The welfare of the animal always comes first. Avoid disturbing nests, dens, or feeding grounds. Keep your distance. Rely on telephoto lenses rather than intruding on wildlife.The goal is to document natural behavior, not provoke a reaction.
3. Adaptability
Conditions change rapidly. Light shifts, animals move, weather turns. Being able to adapt your shooting plan on the fly is one of the most valuable skills you can develop.
Techniques for Capturing compelling Shots:
1. Know Your Subject
Research the animals you want to photograph. Understand their habits—when they feed, rest, or are most active. For example, many animals are more active during golden hour (early morning or late afternoon), when the light is also ideal for photography.
2. Master Your Camera Settings
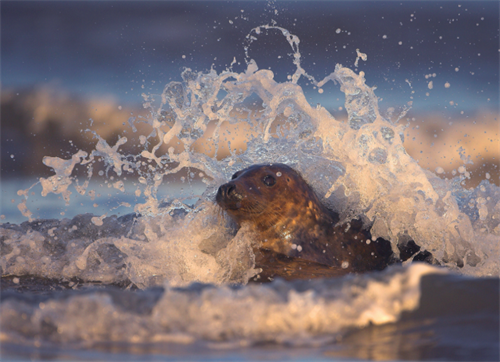
-Shutter Speed: This is your most important setting for sharp images. Use shutter speeds of 1/1000s or faster to capture crisp, motion-free shots. For artistic blur, like a bird’s wing in motion, try slower speeds (1/60s to 1/250s) while panning with the subject.
-Aperture: A wide aperture (f/2.8–f/5.6) helps isolate your subject from the background. If you need more depth of field—for example, when two animals are on different planes—stop down to f/8 or f/11.
-ISO: Don’t be afraid to raise your ISO. It’s preferable to capture a bit of noise rather than end up with blur.Modern cameras handle high ISOs remarkably well.
-Autofocus: Set your camera to continuous AF (AI Servo/AF-C) to track moving subjects.For static subjects, single-point autofocus allows for precision.
3. Composition Matters
-Rule of Thirds: Place the animal off-center for a more dynamic composition.
-Eye Contact: Whenever possible, focus on the eyes. It builds a sense of connection between the subject and the audience.
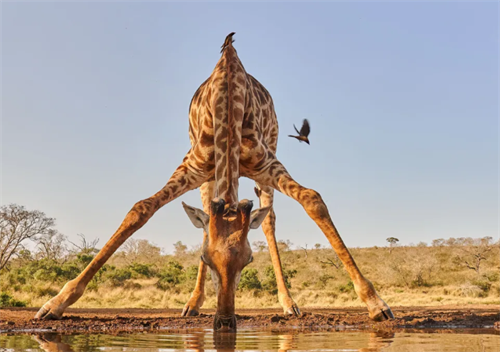
-Include the Habitat: Show the animal in its environment to tell a richer story.
-Use Negative Space: A simple background emphasizes the subject and adds a sense of scale.
Composition and Creativity:
Technical skill gets you a sharp image; creativity makes it memorable.
-Tell a Story: An animal in its environment often tells a richer story than a tight portrait. Include elements like vegetation, water, or terrain to provide context.
-Use Light Creatively: Golden hour—shortly after sunrise and just before sunset—offers soft, warm illumination.But don’t shy away from overcast days—clouds act as a giant softbox, reducing harsh shadows.
-Break the Rules: While the rule of thirds is a reliable guide, sometimes centering your subject or using negative space can create a more dramatic or minimalist image.
-Capture Behavior: Photos of animals interacting, hunting, or playing are often more compelling than static portraits.
-Weather and Seasons: Don’t avoid bad weather. Rain, snow, and fog can add mood and atmosphere to your images.
-Details and Close-Ups: Focus on patterns, textures, or unique features—like the scales of a reptile or the feathers of a bird.
In the Field – Strategies for Success:
1. Research and Location Scouting: Know where your subjects are likely to be and when they are most active. Local guides, online forums, and eBird can be invaluable resources.
2. Blend In: Wear neutral-colored clothing and move slowly and quietly. Using a hide or a vehicle as a blind can make animals much more comfortable with your presence.
3. Anticipate Behavior: Learn to read animal body language. A bird shifting its weight may be about to take flight; a predator lowering its body is likely preparing to stalk. Anticipating these moments is key to capturing them.
Post-Processing Tips:
1. Crop Carefully
By cropping, you can enhance your composition, eliminate unwanted elements, and guide the viewer’s eye.However, avoid over-cropping, as it can reduce image quality and make photos look pixelated.Aim to get your composition right in-camera, using cropping only as a final refinement.
2. Adjust Exposure and Contrast
Correcting exposure can bring out details lost in shadows or highlights. Adjust contrast subtly to ensure your subject stands out against the background without making the image appear unnatural. A well-balanced exposure enhances mood while preserving the realism of the scene.
3. Sharpening
Use sharpening selectively to highlight textures like fur, feathers, or scales. Be mindful not to overdo it—excessive sharpening can create halos or noise that distracts from the natural look of the image.
4. Color Correction
Natural light can sometimes cast unwanted color tones (such as too much blue in shade or orange at sunset). Use white balance adjustments to restore accurate, lifelike colors that reflect what you saw in the field.
5. Noise Reduction
When shooting in low light or with high ISO, noise is inevitable. Apply noise reduction carefully to smooth out grain while retaining important detail. Striking a balance is key—too much noise reduction can make the photo appear soft or artificial.
6. Keep It Real
Avoid heavy filters, gimmicky presets, or manipulations that alter the essence of the moment. Your images should honor the subject and its environment, preserving the sense of awe that comes from seeing wildlife in its natural state.
Ethical Wildlife Photography:
Never forget: the well-being of your subject matters more than any photograph.
Never lure or harass wildlife to capture a better photo.
Learn the rules of protected areas and make sure to follow them at all times.
The core of many tips lies in being flexible when photographing wild animals. Don't get too fixated on the photos you envision in your mind, and don't always assume that the most straightforward animal portraits are the best shots. The subject is in motion; the light is not always consistent; unwanted objects may appear in your lens. However, if you can maintain a flexible and open, creative attitude, you can make the most of these situations and capture some wonderful wildlife photos.
Recommend:

Self-Driving Tour in Tibet: Crossing National Highway 318 and Arriving at the Place Closest to Heaven

International Travel Emergency Guide: How to Handle Unexpected Situations
World-Class Hiking Routes for Beginners to Professionals

Top Countries Chinese Travelers Can Explore Without a Visa