
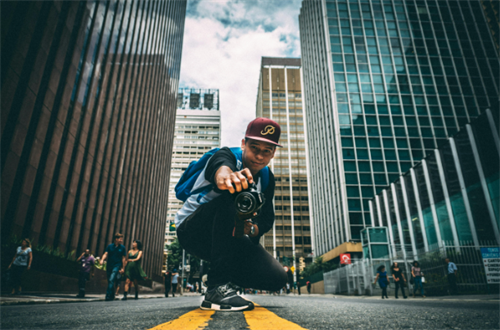
Most people view the world from a standing or eye-level position, and this perspective often translates into their photographs. While familiar, this approach can lead to repetitive and uninspiring images. By contrast, Low-angle photography breaks this monotony by introducing drama, scale, and emotional depth.It transforms ordinary scenes into extraordinary compositions, reveals details hidden by conventional perspectives, and creates emotional connections that eye-level shots often miss.
Why Shoot from a Low Angle?
1. Visual Impact: Low angles exaggerate height and scale, making subjects appear larger than life.
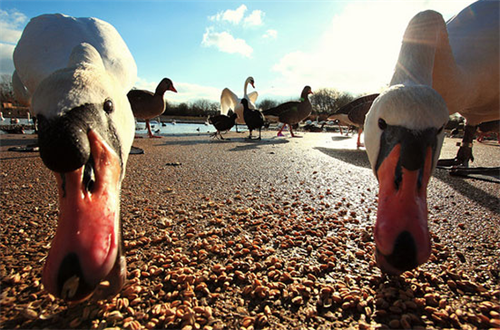
2. Narrative Depth: By adopting the viewpoint of a child, animal, or even an inanimate object, photographers can tell more engaging stories.
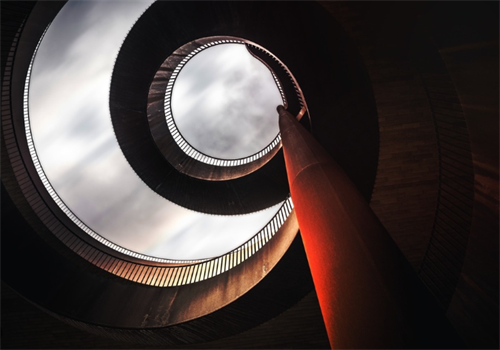
3. Simplified Composition: Shooting upward often includes the sky as a backdrop, reducing clutter and emphasizing the subject.
Technical Foundations for Low-Angle Photography:
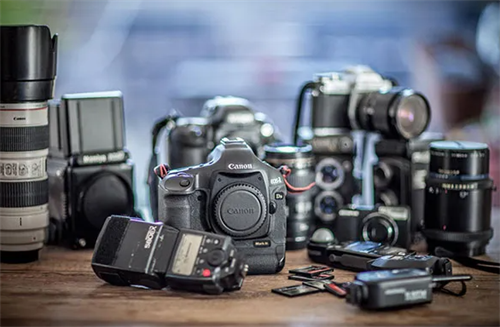
1. Equipment Recommendations
-Wide-Angle Lenses: Ideal for capturing expansive scenes and emphasizing foreground elements. Their inherent distortion can creatively enhance perspective.
-Tilting LCD Screens: Essential for composing shots without physically straining or relying on guesswork.
-External Levelers: Ensure horizon lines remain straight, especially when shooting blindly.
2. Camera Settings
-Aperture Priority Mode: Use a narrow aperture (e.g., f/8–f/16) for deep focus in landscape shots, or a wide aperture (e.g., f/1.8–f/2.8) to isolate subjects.
-Manual Focus: Pre-focus when possible to maintain clarity on key elements.
-Exposure Compensation: Adjust for high-contrast scenarios (e.g., bright skies against dark foregrounds).

6 Essential Low-Angle Shooting Techniques:
1. Match the Subject’s Perspective (Don’t Just "Shoot Low")
Low-angle shooting is not a one-size-fits-all approach—its effectiveness depends on aligning the angle with your subject’s scale. For small subjects (children under 5, pets, insects, flowers), aim to shoot at their eye level or slightly lower. For larger subjects (adults, buildings, trees), a moderate low angle (kneeling or squatting) will enhance height without distorting features.
-Common Mistake: Shooting a small dog from a standing position (even if you tilt the camera down) still creates a "top-down" perspective. Instead, kneel so the lens is parallel to the dog’s eyes—this captures its personality and makes the viewer feel like they’re interacting with it.
-Pro Tip: For infants or tiny subjects (e.g., ladybugs), lie on the ground with your camera. Use a small bean bag or a portable tripod to stabilize the camera—this prevents shaky shots and lets you focus on framing.
2. Leverage Wide-Angle Lenses (But Avoid Over-Distortion)
Wide-angle lenses (typically 16–35mm for full-frame cameras, or 10–24mm for crop sensors) are ideal for low-angle shooting, and for good reason:
-Broad Field of View: They capture more of the background (e.g., a vast sky, a distant landscape), which contrasts with the foreground and enhances depth.
-Perspective Enhancement: They exaggerate the "near-far" effect—objects close to the lens appear larger, while distant objects shrink, amplifying the sense of height and drama.
However, wide-angle lenses can cause distortion (e.g., curved horizons, stretched faces) if used carelessly. To avoid this:
-Keep Horizons Centered: If your shot includes a horizon (e.g., a beach scene), place it in the middle of the frame—distortion is most severe at the edges of wide-angle lenses.
-Avoid Extreme Close-Ups of Faces: When shooting portraits with a wide-angle lens, keep the camera at least 1.5 meters from the subject’s face. Extreme close-ups will stretch the nose, chin, or forehead, creating an unflattering effect.
-Use Post-Processing for Correction: Tools like Adobe Lightroom’s "Lens Correction" feature can fix minor distortion, especially for horizons or straight lines (e.g., building edges).
3. Prioritize Framing and Composition (Be Patient!)
Low-angle shooting often requires "blind framing"—especially if you’re lying on the ground and can’t see through the viewfinder.
-Use Live View and Rotating Screens: Most modern cameras and smartphones have a Live View mode and a rotating LCD screen. Tilt the screen upward so you can see the frame without leaning over the camera—this lets you adjust composition (e.g., move the camera left/right to center the subject) without disrupting your position.
-Stick to Basic Composition Rules: Apply the Rule of Thirds (divide the frame into a 3x3 grid and place the subject at the intersections) to avoid lopsided shots. For example, when shooting a tree from a low angle, place the trunk at the right third of the frame, with the sky filling the left two-thirds—this creates balance.
-Experiment with "Test Shots": Take 2–3 quick shots, then review them on the screen. Adjust the camera’s position (e.g., move it closer to the foreground object, tilt it slightly up) based on what you see. This trial-and-error process is key to finding the perfect frame.
4. Master Exposure (Avoid Blown-Out Skies or Dark Subjects)
Low-angle shots often involve high contrast—bright skies in the background and darker subjects in the foreground (e.g., a flower against a sunny sky). This can lead to two common issues: overexposed skies (white, detail-less) or underexposed subjects (dark, lacking texture). Here’s how to fix it:
-Use Exposure Compensation: Most cameras and smartphones have an exposure compensation dial (marked with a "+/-" symbol). If the sky is too bright, decrease exposure by 1–2 stops (-1, -2) to preserve cloud details. If the subject is too dark, increase exposure by 1 stop (+1) to brighten it.
-Spot Metering: For precise exposure, use spot metering (select this mode in your camera’s settings). Point the meter at the subject (e.g., a child’s face, a flower petal) to ensure it’s properly exposed— the camera will adjust the settings to prioritize that area, even if the background is slightly overexposed.
-Use a Reflector or Fill Light: For portraits or close-ups, use a small reflector (or even a white piece of paper) to bounce light onto the subject’s face. This reduces shadows and ensures the subject is bright, even if the background is bright. For smartphone shots, use the built-in flash on "fill" mode (not full power) to avoid harsh shadows.
5. Ensure Horizons and Lines Are Straight
Nothing ruins a low-angle shot faster than a tilted horizon or crooked lines (e.g., a building that looks like it’s falling over). Wide-angle lenses amplify this issue, as even a 1-degree tilt will look exaggerated.
-Use a Level Tool: Most cameras (DSLRs, mirrorless) have a built-in electronic level—enable it in the settings, and it will display a horizontal line on the screen to help you align the horizon. For smartphones, download a free level app (e.g., "Bubble Level") to ensure straight framing.
-Use Tripods or Stabilizers: A portable tripod (or a gorilla pod for uneven surfaces) keeps the camera steady and prevents accidental tilting. For ground-level shots, a low-profile tripod (less than 10 inches tall) is ideal— it lets you position the camera close to the ground while maintaining stability.
-Correct in Post-Processing: If your horizon is slightly tilted, use the "Crop" tool in Lightroom, Photoshop, or even smartphone apps like Snapseed. Most tools have a "Level" feature that automatically straightens the horizon—just drag the slider until the lines look even.
6. Use Foreground Elements to Add Depth
As mentioned earlier, foreground interest is key to low-angle photography—it adds texture, guides the viewer’s eye, and creates a sense of depth. The best foreground elements are small, detailed, and complementary to the background:
-Natural Elements: Stones, moss, flowers, grass, puddles, or fallen leaves. For example, a low-angle shot of a lake with water droplets on a lily pad in the foreground adds texture and makes the lake feel more immersive.
-Man-Made Objects: Cracked sidewalks, discarded books, coffee cups, or toy cars. These elements add context to street or urban shots—e.g., a low angle of a city skyline with a broken bicycle chain in the foreground tells a story of "urban decay meets grandeur."
-Pro Tip: Ensure the foreground element is in focus (use manual focus if auto-focus struggles) and that it doesn’t block the main subject. For example, if you’re shooting a child with a flower in the foreground, place the flower slightly to the side so the child’s face is still visible.
Overcoming Common Challenges:
1. Exposure Management
Low-angle shots often capture bright skies against darker foregrounds. To balance the exposure:
Use graduated neutral density (ND) filters.
Shoot in RAW format for greater post-processing flexibility.
Bracket exposures and blend them later.
2. Composition and Framing
Without a viewfinder, composing shots can be challenging. Try “blind shooting” by anticipating the frame and making adjustments after reviewing your first shots. Modern cameras with real-time electronic viewfinders or articulating screens simplify this process.
3. Horizon Alignment
Crooked horizons distract viewers. Use in-camera grid overlays or an external hot-shoe level to ensure stability and straight horizons.
Creative Exercises to Develop Your Skills:
1. The "Worm’s-Eye View"
Spend an hour shooting only from ground level. Focus on textures, patterns, and overlooked details.
2. Urban Exploration
Photograph buildings from their bases, emphasizing structural lines and cloud movements.
3. Storytelling with Scale
Photograph a subject—such as an insect or flower—from both eye level and ground level to see how perspective changes the story.
low-angle shooting teaches you to see not just what’s in front of you, but what’s hidden beneath the familiar. The next time you pick up your camera, ask yourself: What would this scene look like from the ground? Kneel down, lie on the grass, or lean against a wall—and shoot. You’ll be surprised by how ordinary moments transform into extraordinary images.
Recommend:

Top 10 Hidden Gems of Small Islands in Southeast Asia: Scenic Beauty, Low Population, and Exceptionally High Value for Money
What type of photographic equipment has a higher rate of retaining its value?
Diving Beginner's Manual: Explore the Blue Poison of Palau and Sipadan Together
Mastering Animal Photography: Capture Stunning Moments of Wildlife
